
ESP8266_01 Guide
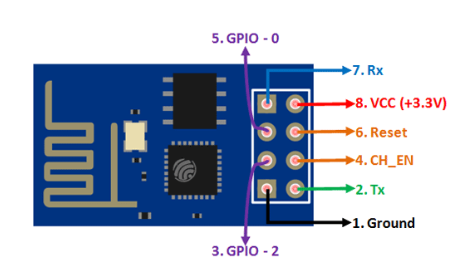
The ESP8266 ESP-01 is a Wi-Fi module that allows microcontrollers access to a Wi-Fi network. This module is a self-contained SOC (System On a Chip) that doesn’t necessarily need a microcontroller to manipulate inputs and outputs as you would normally do with an Arduino. Pin Configuration ESP-01:


Setting up Arduino IDE for ESP8266
1) Install Arduino IDE software from the link http://www.arduino.cc/en/main/software
2) open Arduino IDE
3) Open the File and click on the Preferences as shown in the figure

4) Adding ESP8266 Board manager

In the Additional Boards Manager enter below URL.
http://arduino.esp8266.com/stable/package_esp8266com_index.json
6) Selecting the board
Now open the tools in that select Board: “Arduino/Genuino Uno” and click on the Boards Manager as shown in the figure

7) ESP8266 Board Package

8) Selecting ESP8266 Arduino Board

Connecting ESP8266 to WIFI network
The ESP8266 WiFi Module can be interfaced to any other microcontroller
WIFI Modes of Operation
- Station Mode (STA)
- Soft Access Point (AP)
- Soft AP + Station
STA Mode: In Station Mode (STA), the ESP8266 WIFI Module will be connected to a WIFI Network that is already setup by an Access Point, like a WIFI Router.
Soft Access point: The second mode of operation is Access Point (AP) Mode. In this mode, the ESP8266 Module acts as an access point and provide WIFI Network to other stations (like mobile or laptop).
Usually, an access point can provide internet through a wired network to its stations but as there is no wired interface, this Access Point mode is called Soft Access Point.
Soft AP + Station: In the third mode, the ESP8266 WIFI Module is configured to act in both Station Mode and Soft AP Mode.
All these Modes of Operation are set using AT Commands. In this tutorial, I will discuss about the AT Commands that are required to connect ESP8266 to WIFI Network.
How to Connect ESP8266 to WIFI Network using AT Commands
1) First you have to check ESP8266 WiFi Module is loaded with AT Commands Firmware
So, after connecting the ESP8266 in Programming Mode and ensuring that it has AT Commands Firmware, connect the Arduino to the Computer and open the Serial Monitor.
2) First, type the following command to test whether the communication is successful or not.
AT
3) Then, restart the ESP8266 Module using the following command, just to make sure that it start fresh
AT+RST
4) Now, set the Mode of operation as Station Mode. For this, use the following command.
AT+CWMODE=1
5) The Mode of Operation has been set as Station Mode (STA). Now, to see the list of all the nearby WiFi Networks, use the command shown below.
AT+CWLAP
6) In order to join a network, use the following command.
AT+CWJAP=”SSID”,”PASSWORD”
In place of SSID, type the name of your WiFi Network and in place of PASSWORD type the password.
7) Within few seconds, you will get a confirmation response as WIFI Connected. In order to check the IP Address of the ESP8266 WiFi Module, type the command.
AT+CIFSR
Note: you can’t perform OTA on ESP-01 due to memory limitations
Alternative Way to Connect Your ESP8266 WiFi Module to a WiFi Network
NOTE: In the code, enter the details of your WiFi Network in place of “ssid” and “password”
Introduction to NodeMCU
NodeMCU is an open source LUA based firmware developed for ESP8266 wifi chip. By exploring functionality with ESP8266 chip, NodeMCU firmware comes with ESP8266 Development board/kit i.e. NodeMCU Development board
NodeMCU Dev Kit/board consist of ESP8266 wifi enabled chip. The ESP8266 is a low-cost Wi-Fi chip developed by Espressif Systems with TCP/IP protocol
NodeMCU Pin Configuration


Connecting NodeMCU to WIFI network and creating AP
In this tutorial, you’ll learn how to set your ESP8266 NodeMCU as an Access Point (AP) using Arduino
In this scenario, the router acts as an access point and the ESP8266 is set as a station. So, you need to be connected to your router (local network) to control the ESP8266.

In some cases, this might not be the best configuration (when you don’t have a router nearby). But if you set the ESP8266 as an access point (hotspot), you can be connected to the ESP8266 using any device with Wi-Fi capabilities without the need to connect to your router.

when you set the ESP8266 as an access point you create its own Wi Fi network and nearby Wi-Fi devices (stations) can connect to it
If you are still facing issue regarding ESP01 and ESP8266 in arduino Feel free to Ask Doubts in the Comment Box Below and Don’t Forget to Follow us on 👍 Social Networks😉


