Now let’s start with navigating to the Dashboard.
Note: Make sure your Dashboard is not Private.
Next thing is to edit the sourcecode of the dashboard, and make some changes which will Hide header of SPLUNK ENTERPRISE as well as EDIT option over Dashboard, making our system less vulnerable.
Edit your Dashboard with following changes
Click on Edit > Source (At Upper Right side of Dashboard)
Now we are going to create new user in our splunk enterprise and this user will have less privileges/assigned roles, which will make this less vulnerable.
Navigate to Setting > Access Controls > +Add new. (To add new user)
Continue following the below steps……
So, our work at the splunk end is almost done we can embed our dashboard into webpage.
Edit your Webpage (HTML) where Dashboard will go.
- Include above (< iframe >) tag in your webpage with appropriate changes.
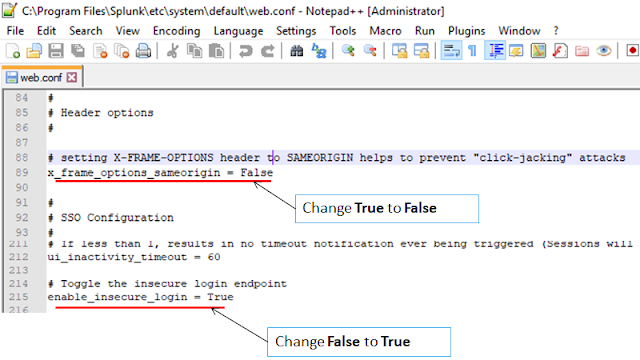
The most importantly thing is to edit configuration file, for which you need to have backend access. Here we are going to edit web.conf file.
Path for web.conf file -> $Splunk_Directory$/etc/system/default/web.conf
Notes:
- Changing x_frame_options_sameorigin will allow splunk dashboard to be shared on another webpage.
- And changing enable_insecure_login will allow to splunk login credentials to hardcoded within the url.
Dashboard is now embed inside Website done!!
If you are still facing issue regarding this topic Feel free to Ask Doubts in the Comment Box Below and Don’t Forget to Follow us on 👍 Social Networks, happy Splunking >😉


