• 8 Capacitive Touch Sensor Inputs
• 8 LED Driver Outputs
• Programmable sensitivity
• Automatic recalibration
• Individual thresholds for each button
• Proximity Detection
• Multiple Button Pattern Detection
• Analog Filtering for System Noise Sources
• Press and Hold feature for Volume-like Applications
• Low Power Operation
Hardware connection: –
CAP1188 Arduino
GND GND
5V Vin
MISO 11
MOSI 12
SCK 13
CS 10
RESET 9
IRQ 3
A0 GND
Source code: –
Download the library:-
First up, we’ll download the Arduino library from the Arduino library manager.
Open the Arduino library manager:
Search for the Adafruit CAP1188 library and install it
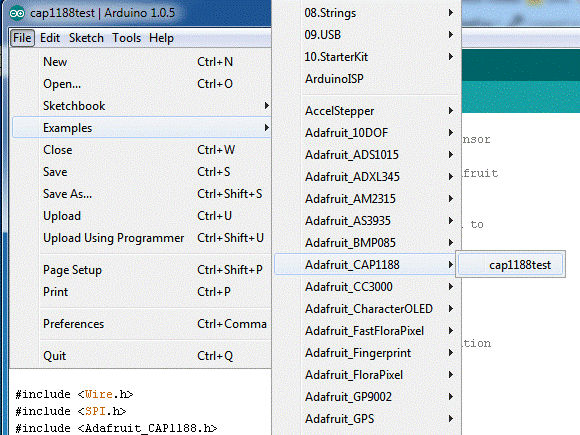
After you’ve restarted, you should be able to load up the File -> Examples -> Adafruit_CAP1188-> cap1188test sketch
Wireup the connection as shown in above hardware connection
Upload the sketch and open the serial console at 9600 baud. You should see that the CAP1188 is found (good!) and then you can touch the C1 thru C8 pads with your fingers to see the touch sensor go off. When you touch a pin, you’ll also see the matching LED light up
OUTPUT :
Explanation:
1) Include all the files such as adafruit_cap1188.
- #include <Wire.h>
- #include <SPI.h>
- #include <Adafruit_CAP1188.h>
2)Make all the SPI connection with cap1188. Define all the pins according in the code. Reset Pin is used for I2C or SPI. CS pin is used for software or hardware SPI. MOSI, MISO and CLK are pins used for SPI communication.
-
#define CAP1188_RESET 9#define CAP1188_CS 10#define CAP1188_MOSI 11#define CAP1188_MISO 12#define CAP1188_CLK 13
3) Initialize cap1188 SPI function.
- Adafruit_CAP1188 cap = Adafruit_CAP1188(CAP1188_CLK, CAP1188_MISO, CAP1188_MOSI, CAP1188_CS, CAP1188_RESET);
4) Initialize cap1188 sensor with address if you are using I2C method otherwise follow below code.
-
// if (!cap.begin(0x28)) {cap.begin(); //custom changesSerial.println(“CAP1188 found!”);pinMode(3, INPUT);
5) Turn off multitouch functionality so only one button will press at a time. The function cap.writeRegister has may configurations regarding multi touch, led and interrupt.
-
cap.writeRegister(0x2A, 0x80); // 0x2A default 0x80 use 0x41 — Set multiple touches back to offcap.writeRegister(0x41, 0x39); // 0x41 default 0x39 use 0x41 — Set “speed up” setting back to offcap.writeRegister(0x72, 0x00); // 0x72 default 0x00 — Sets LED links back to off (default)cap.writeRegister(0x44, 0x41); // 0x44 default 0x40 use 0x41 — Set interrupt on press but not releasecap.writeRegister(0x28, 0x00); // 0x28 default 0xFF use 0x00 — Turn off interrupt repeat on button holdEIFR = 1; // clear flag for interrupt 1attachInterrupt(1, routine_Interrupt_CAP1188, FALLING);}
6) In the loop function check if any touch is detected according to pin the output will be display.
Check for interrupt. In the loop whenever touch is detected due to cap.writeRegister(0x44, 0x41). The interrupt function routine_Interrupt_CAP1188() is invoked. This increments the value of interrupt and the loop is continued.
-
void loop() {uint8_t touched = cap.touched();if (touched == 0) {// No touch detected// return;}for (uint8_t i=0; i<8 i=”” nbsp=”” p=””> if (touched & (1 << i)) {
Serial.print(“C”); Serial.print(i+1); Serial.print(“t”);
}
}
Serial.println();
delay(50);
Serial.print(“Interrupt: “); Serial.println(interrupt);
}void routine_Interrupt_CAP1188() {
++interrupt;
}
If you are still facing issue regarding CAP1188 SPI ARDUINO Feel free to Ask Doubts in the Comment Box Below and Don’t Forget to Follow us on 👍 Social Networks😉


