

Thingworx Azure IoT hub connector: –
In this tutorial we will implement how to connect Thingworx to Azure IoT hub and send Thingworx data on cloud platform
Thingworx Azure IoT hub includes: –
1) Thingworx connection server
2) Azure IoT protocol Adaptor
3) Azure IoT Extension
Architecture Diagram
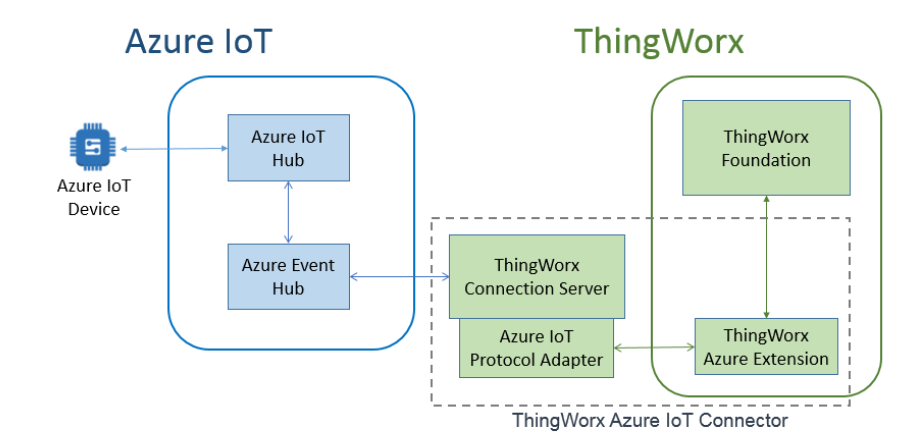
Azure IoT hub Connector: –
handles message routing for the devices that communicate through the Azure IoT system. It also handles message routing from the ThingWorx Foundation server to devices via the Azure IoT Hub.
Thingworx connection server: –
stand-alone application that must be run on a server that can connect to both the ThingWorx server and the Azure IoT service.
Configure Azure IoT hub Connector: –
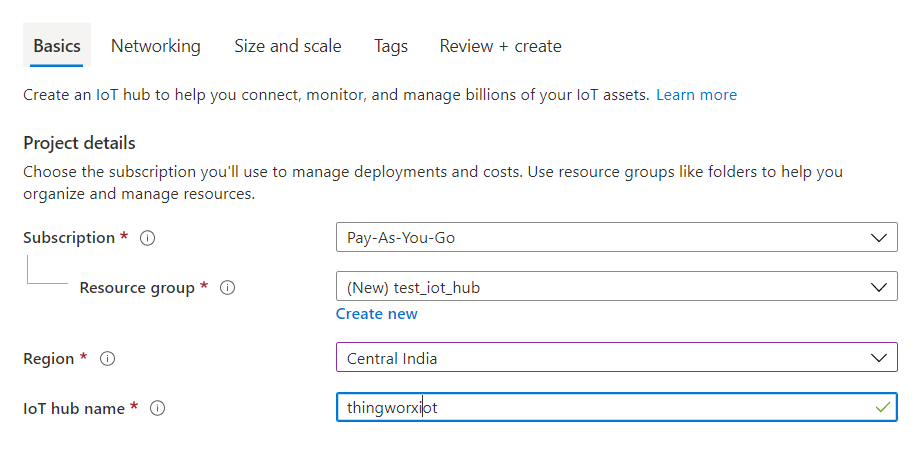
1) login to Azure portal
2) create Azure IoT Hub
· Sign in to the Azure portal.
· From the Azure homepage, select the + Create a resource button, and then enter IoT Hub in the Search the Marketplace field.
· Select IoT Hub from the search results, and then select Create.
On the Basics tab, complete the fields as follows:
· Subscription: Select the subscription to use for your hub.
· Resource Group: Select a resource group or create a new one. To create a new one, select Create new and fill in the name you want to use. To use an existing resource group, select that resource group. For more information, see Manage Azure Resource Manager resource groups.
· Region: Select the region in which you want your hub to be located. Select the location closest to you. Some features, such as IoT Hub device streams, are only available in specific regions. For these limited features, you must select one of the supported regions.
· IoT Hub Name: Enter a name for your hub. This name must be globally unique. If the name you enter is available, a green check mark appears.
· Click on size and scale and select free tier
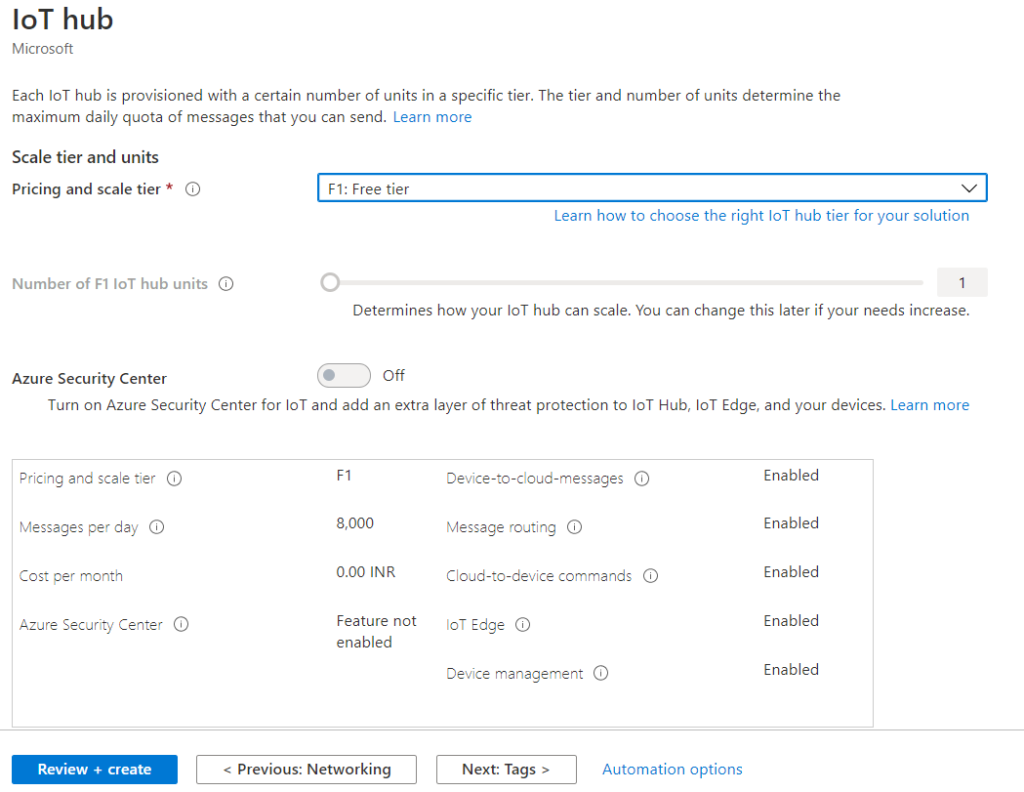
· Click on review and create and create your new hub
Change the settings of the IoT hub
You can change the settings of iot hub from its iot hub pane

Register new device in IoT hub
In this section you create a device identity in the identity registry in your IoT hub. A device cannot connect to a hub unless it has an entry in the identity registry
· In your IoT hub navigation menu, open IoT Devices, then select New to add a device in your IoT hub and click on save
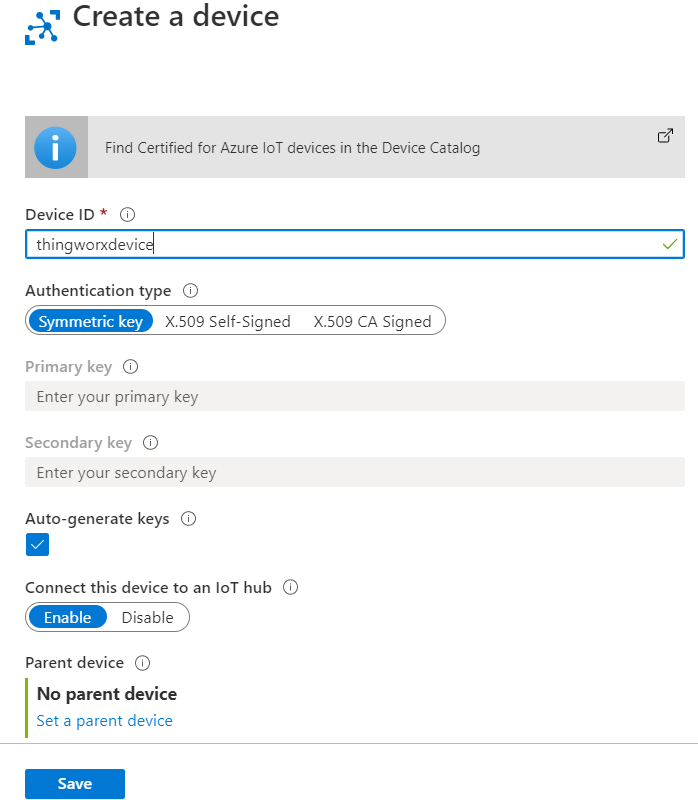
· Your device will be appear on the IoT hub pane
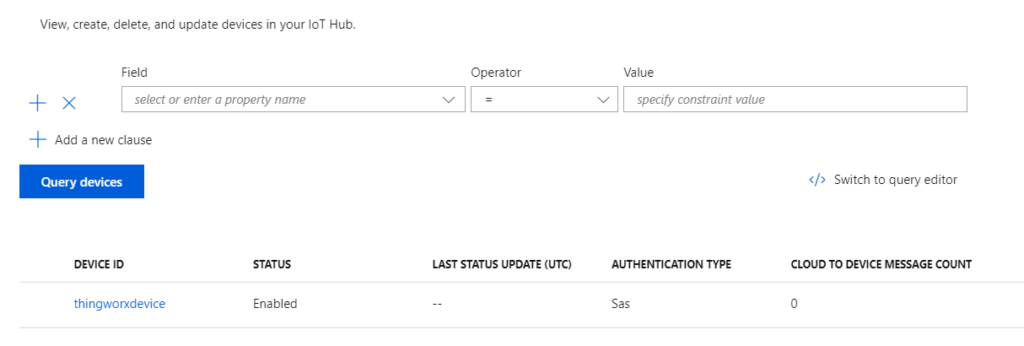
· After the device is created, open the device from the list in the IoT devices pane. Copy the Primary Connection String to use later.

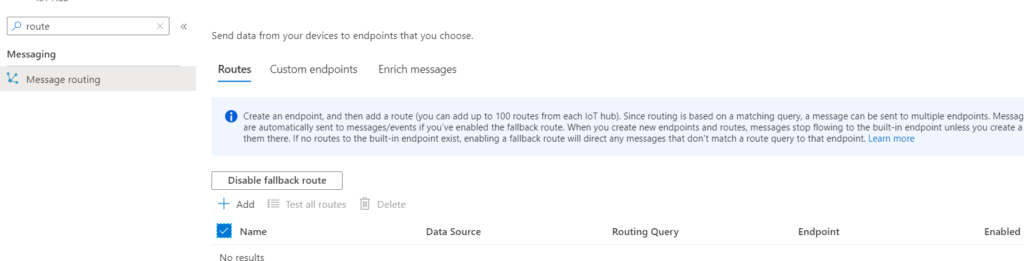
Message routing for an IoT hub
Message routing enables that how to send data from one point (device) to end point. first step is add new route then next you can add an existing end point to the route
· Click on add and fill out the details of route
· Name your hub. The name must be unique within the list of routes for that hub.
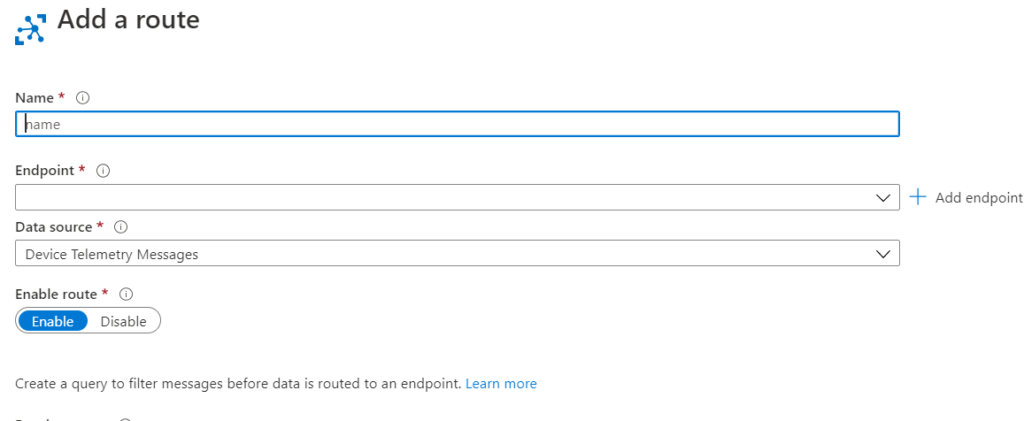
For Endpoint, you can select one from the dropdown list, or add a new one. In this example, a storage account and container are already available. To add them as an endpoint, click Add next to the Endpoint dropdown and select Blob Storage
· Click on save
· Click the custom endpoints tab. you will see custom endpoints you can add or delete existing custom endpoint
Launch IoT Hub connector
· Install IoT hub connector
· Download the distribution bundle:ThingWorx-Azure_IoT-Hub-Connector-2.0.0.141.zip
· Extract the application bundle to a directory on the system where it will run. (where v.v.v represents the release number)
o On Linux, this guide uses the base directory, /opt. The subdirectories and files should reside in the directory, /opt/ThingWorx-Azure-IoTHub-Connector-v.v.v.
o On Windows, extract the bundle so that the subdirectories and files reside in C:\ThingWorx-Azure-IoT-Hub-Connector-v.v.v
Configure connection server:
· Copy the file azure-iot-sample.conf in the connector > conf directory and save the file with the name azure-iot.conf
· Edit the configuration file to replace the ten placeholder values for the parameters listed below with values copied from your Azure control panel.
o consumerPolicyName – Whether you have a new or existing hub, you need to provide the name of the consumer policy and its related Primary or Secondary key. The policy to select is typically the built-in, pre-defined policy called service. Navigate to All Resources > your hub > Settings > Shared access policies > service. If you added a custom service policy to your hub with the permission service connect select that policy.

consumerPolicyKey – Once you find the policy name, stay in the Shared access policies screen, and click the name. Copy the content of the Primary key. This key supplies the credentials to access services that are specified in the related policy.
Find out built-in endpoints key
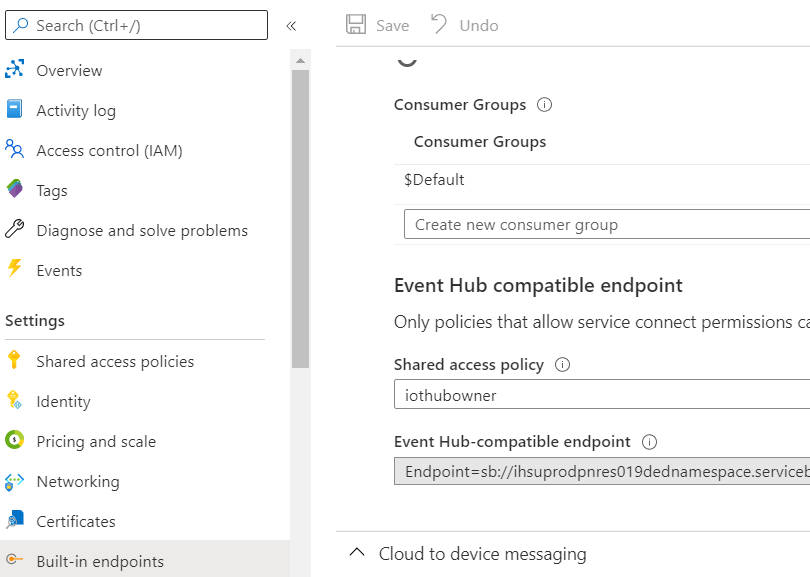
eventHubNamespace – To find the endpoint that is used by SDKs and integrations that expect to read from Event Hubs, navigate to All resources > your hub > Settings > Built-in endpoints > Events > Event Hub-compatible endpoint, and copy the host name, without the rest of the address (“.servicebus.windows.net”). The ThingWorx Azure IoT Connector uses this endpoint to read messages from your hub
blob-storage.account-name – The blob-storage section specifies the settings for an Azure blob storage account. The storage provides containers that are used for device export of an Azure IoT Hub to ThingWorx via the Connector and can also be created by the Connector if you create AzureStorageContainerFileRepository things in ThingWorx. If you do not have one, create a Storage Account in the Azure portal. To find the name of an existing account, navigate to Settings > Access Keys > Storage account name.
blob-storage.account-key – The key to associate with the name of the blob storage account. To find the key for an existing account, navigate to Settings > Access Keys > Primary or secondary key
· Enter your ThingWorx Foundation server host, port, and appKey in the transport.websockets section.
transport.websockets {
    // ThingWorx platform application key
    app-key = "XXXXXXXXXXXXXXXXXXXXXXXXXXXX"

    // One or more platforms can be specified here, comma separated
    platforms = "ws://45.23.12.112:80/Thingworx/WS"
}
Start connection server: –
- Open a shell or a command prompt window. On a Windows machine, open the command prompt as Administrator.
- The AZURE_IOT_OPTS environment variable must be set before starting the Azure IoT Hub Connector. Below are sample commands using the default installation directory.
o On Windows: set AZURE_IOT_OPTS=-Dconfig.file=C:\ThingWorx-Azure-IoT-Connector-\azure-iot–application\conf\azure-iot.conf -Dlogback.configurationFile=C:\ThingWorx-Azure-IoT-Connector-\azure-iot–application\conf\logback.xml
o On Linux: export AZURE_IOT_OPTS=”-Dconfig.file=/var/opt/ThingWorx-Azure-IoT-Connector-/azure-iot–application/conf/azure-iot.conf -Dlogback.configurationFile=/var/opt/ThingWorx-Azure-IoT-Connector-/azure-iot–application/conf/logback.xml”
NOTE: You must run the export command each time you open a shell or command prompt window. - Change directories to the bin subdirectory of the Azure IoT Hub Connector installation.
- Start the Azure IoT Hub Connector with the appropriate command for your operating system.
o On Windows: azure-iot.bat
- The Connection Server should start with no errors or stack traces displayed. If the program ends, check the following:
o Java version is 1.8.0, update 92 or greater and is Java(TM) not OpenJDK
o Open azure-iot.conf and confirm ThingWorx Foundation is set to the correct URL and port.
o Confirm the platform scheme is ws if http is used to access ThingWorx.
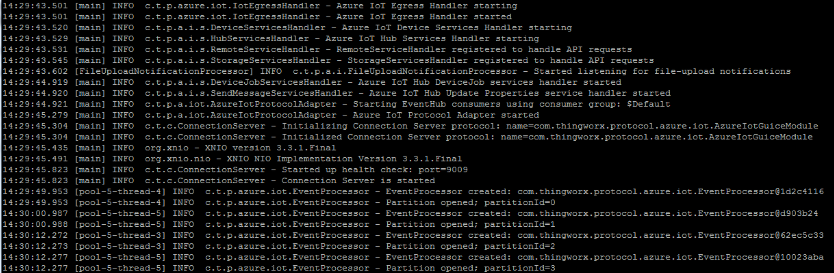
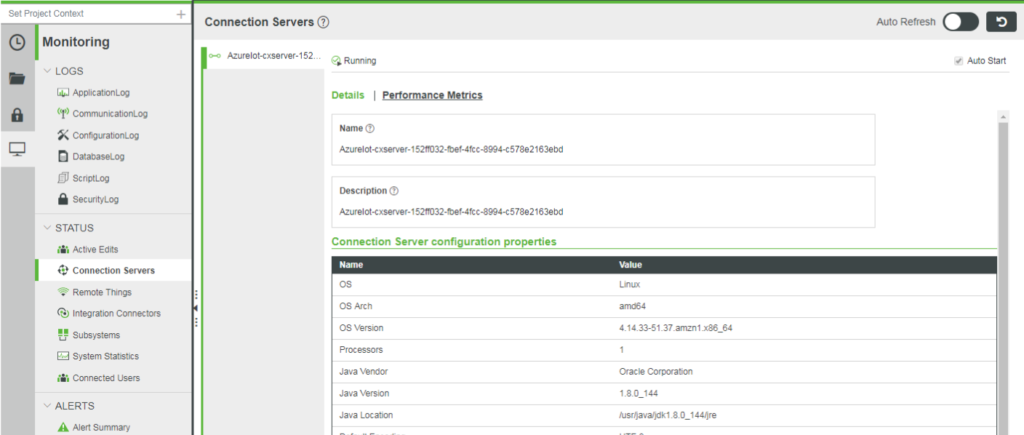
o Confirm all Azure credentials are correct for your Azure account. - In ThingWorx Foundation click the Monitoring tab then click Connection Servers. You should see a server named azure-iot-cxserver-{server-uuid}, where {server-uuid} is a unique identifier that is assigned automatically to the server.
Import device from azure into Thingworx
you can import into ThingWorx any existing devices that are currently provisioned to the Azure IoT Hub.
- In your Azure Portal, click All Resources, then select the name of your IoT Hub.
- Under Explorers click IoT devices, then click + Add.
- Enter a name for your device, then click Save
- When the device name appears in the list it is ready to use

Import device into Thingworx
- We will manually execute a service in ThingWorx that will import Azure IoT Hub devices into ThingWorx.
- In ThingWorx Composer, navigate to the ConnectionServicesHub Thing.
- Click Services tab and scroll to the ImportAzureIotDevices service and click the execute Arrow.

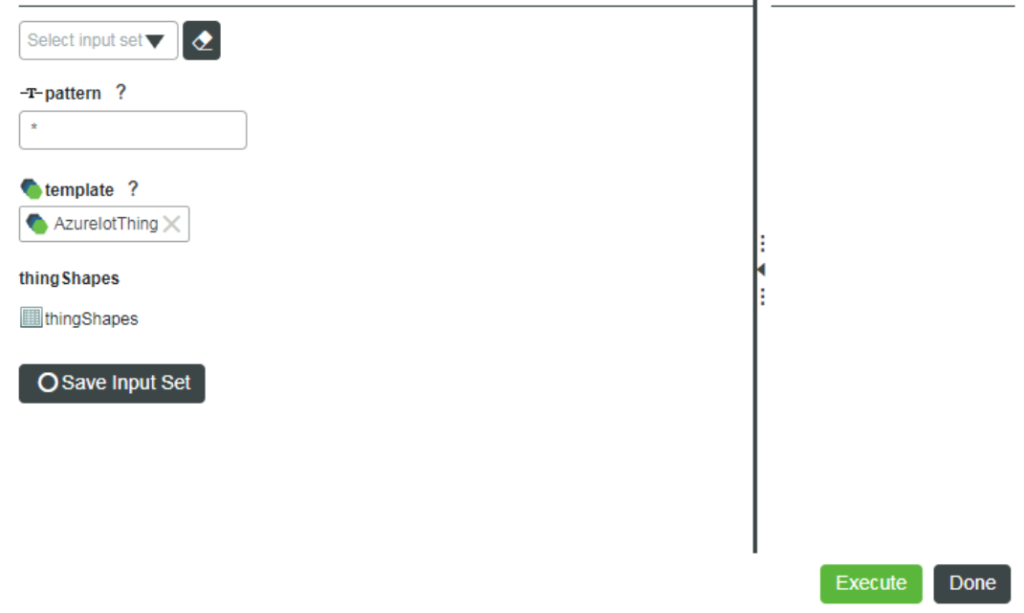
· Click Execute to import the devices then click Done.
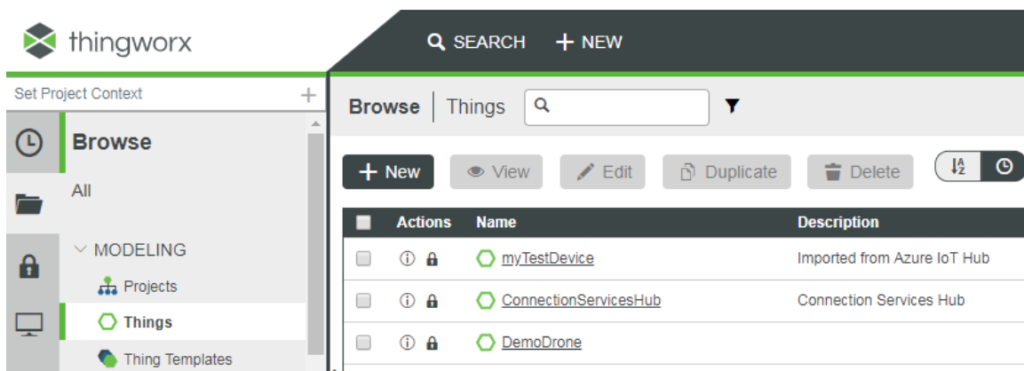
· Click Things in the left column to see the Things that were created.
Setup and run Template:
Import demo templates
· In ThingWorx Composer, click Import/Export menu, then click From File and browse to ../demo/edgedevice- demo/platform/entities/CPUDemo_AllEntities.xml
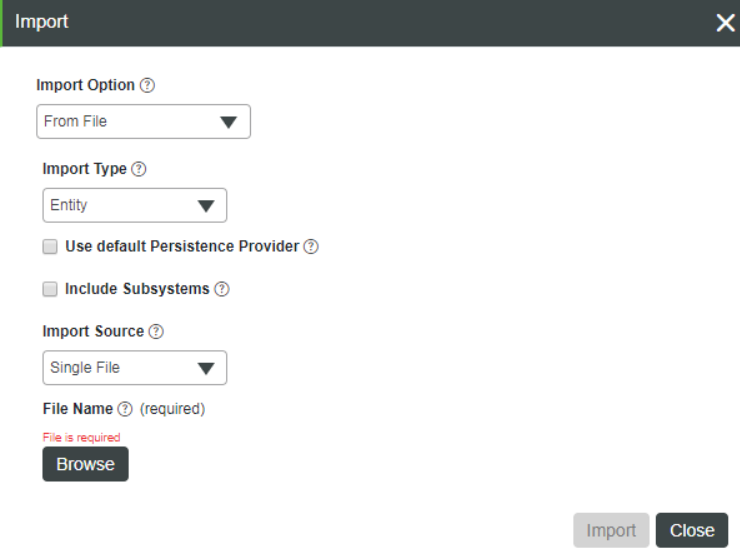
· Click Import then click Close when the import successful message is displayed.
· Create a new Thing using the imported template azureDemo1, enter a name for your Thing and click Save.
Configure demo application
· In the ../demo/edge-device-demo/conf subdirectory, open the edge-device.conf file with a text editor.
· Edit the deviceId to be the name of the Thing you created in step 3.
· Edit the iotHubHostName to use the name of your hub plus the domain: azure-devices.net. For example, sample-iot-hub.azuredevices.net.
· Edit the registryPolicyKey property to use the Primary Key for the registryReadWrite policy in the Azure IoT Hub.
Example of configuration
// Azure Edge Device Demo configuration
azure-edge-device {
// Name of the remote thing on the ThingWorx platform, which should match the Azure Device ID
deviceId = "alstestedgething"
// Name of the hub host in Azure
iotHubHostname = "alsiot.azure-devices.net"
// Policy name used by this thing (could require services as well in future)
registryPolicyName = "registryReadWrite"
// The Key related to the policy above
registryPolicyKey = "pzXAi2nonYWsr3R7KVX9WuzV/1234567NZVTuScl/Kg="
}
Run Demo script
- Open a shell or Command Prompt, set the EDGE_DEVICE_DEMO_OPTS environment variable to refer to the file you just edited:
o Linux – export EDGE_DEVICE_DEMO_OPTS=”-Dconfig.file=../conf/edge-device.conf”
o Windows – set EDGE_DEVICE_DEMO_OPTS=”-Dconfig.file=../conf/edge-device.conf” - Launch the demo from the ../demo/edge-device-demo/bin subdirectory, using the edge-device-demo command.
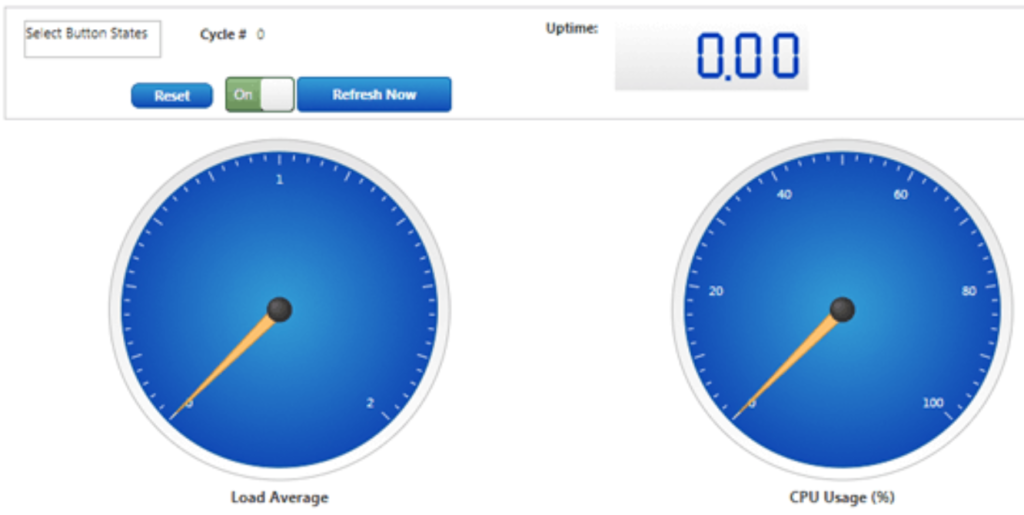
- Return to the ThingWorx Composer and open the Properties page of the Azure Thing that you created previously.
- Click the refresh button to see the properties change every five seconds.
- Open the azure-iot-demo Mashup and view the Load Average and CPU gauges, and the increases in the values of the Cycle and Uptime fields.
If you are still facing issue regarding Thingworx Azure IoT hub connector Feel free to Ask Doubts in the Comment Box Below and Don’t Forget to Follow us on 👍 Social Networks😉 Happy Splunking >


