

A deployment server is a Splunk Enterprise instance that acts as a centralized configuration manager for any number of other instances, called “deployment clients“. Let us understand deployment server architecture below:

Key elements of the deployment server architecture:-
- deployment server:- Splunk Enterprise instance that acts as a centralized configuration manager. It deploys configuration updates to other instances. Also refers to the overall configuration update facility comprising deployment server, clients, and apps.
- deployment client:- This is a remotely configured Splunk Enterprise instance. It receives (Apps) updates from the deployment server.
- server class:- This is a Deployment configuration, it consists of class categories shared by a group of deployment clients. A deployment client can belong to multiple server classes.
- deployment app:- Unit of content deployed to the members of one or more server classes.
To make an instance as Deployment server:-
- The deployment server is the tool for distributing configurations, apps, and content updates to groups of Splunk Enterprise instances (mostly forwarders).
- The deployment server must run on a dedicated Splunk Enterprise instance that is not serving as an indexer or a search head.
- The exception is if the deployment server has only a small number of clients, 50 or less. Under those limited circumstances, it is possible for an indexer or search head to act as a deployment server.
- To make an instance act as a deployment server, severclass.conf should exist in it.
- The deployment server cannot be a deployment client of itself.
Configure Deployment Client:-
1. On each client, you must specify the deployment server that it will connect to.
2. You do this, by configuring the client’s deploymentclient.conf file. Each deployment client
must have a unique network hostname.
3. By three ways we can configure the Deployment Client.
a. Using CLI
b. By Editing the deploymentclient.conf directly.
c. By Web GUI
4. Using the CLI, one can run the below commands:-
a. splunk set deploy-poll < IP_address/hostname >:< management_port >
5. Splunk restart.
6. Edit deploymentclient.conf.
$SPLUNK_HOME/etc/system/local
7. For Windows universal forwarders only: Configure a Windows forwarder as a deployment
client during the installation process.
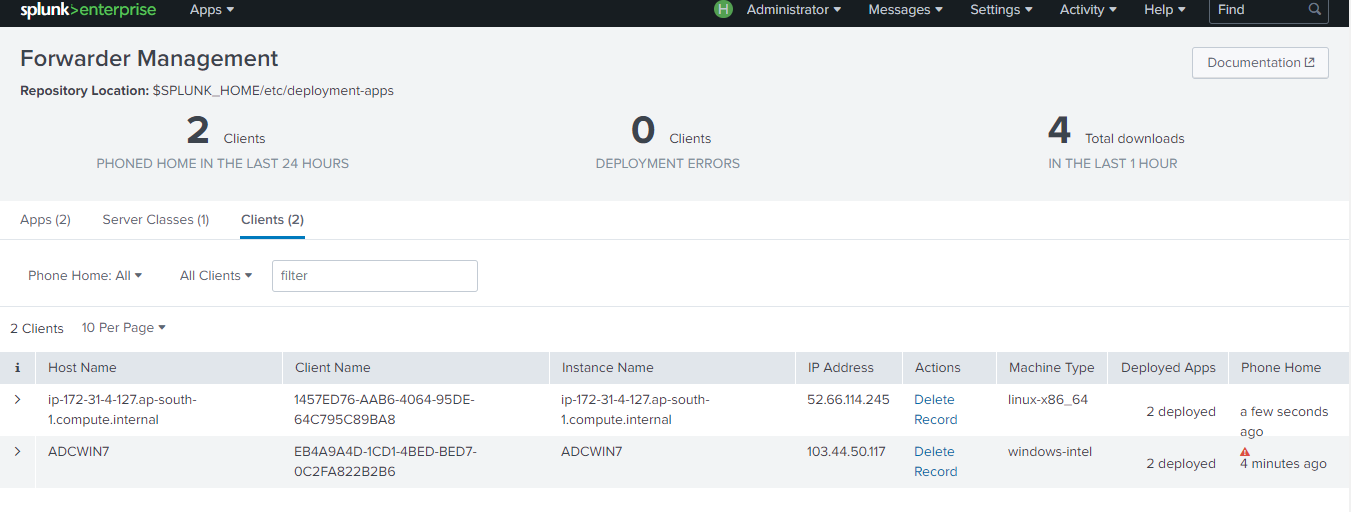
8. We can see the no. of clients from UI for that go to settings >> Forwarder
management of the deployment server.
management of the deployment server.
9. Then click on the clients tab.
Create deployment apps:-
1. A deployment app consists of any arbitrary content that you want to download to a set of
deployment clients.
2. The content can include:
a. A Splunk Enterprise app.
b. A set of Splunk Enterprise configurations.
c. Other content, such as scripts, images, and supporting files.
3. You add a deployment app by creating a directory for it on the deployment server.
4. You create separate directories for each deployment app in a special location on the deployment server. The default location is – $SPLUNK_HOME/etc/deployment-apps
5. After an app is downloaded, it resides under $SPLUNK_HOME/etc/apps on the deployment
clients.
6. We can view apps with forwarder management console for that go to settings >>
Forwarder management.
Forwarder management.

7. We can see the no. of apps deployed from UI for that go to settings >> Forwarder
management of the deployment server.
8.Then click on the apps tab.

Create serverclass.conf :-
1. A server class maps a group of deployment clients to one or more deployment apps.
2. By creating a server class, you are telling the deployment server that a set of clients should
receive updates in the form of a set of apps.
3. You define server classes on the deployment server with these steps :
a. Create the server class.
b. Specify one or more deployment apps for the server class.
c. Specify the clients that belong to the server class.
4. Create the server class
a. Create and name the server class through the forwarder management interface or directly
in serverclass.conf.
5. Specify apps for the server class
a. Once you’ve created the server class, you need to associate deployment apps with it.
b. These are the apps that you earlier created on the deployment server’s file system.
c. There is not necessarily a one-to-one correspondence between server classes and apps.
6. Specify clients for the server class
a. you need to associate clients with the server class.
7. We can see the no. of Server Classes deployed from UI for that go to settings >>
Forwarder management of the deployment server.
Forwarder management of the deployment server.
8. Then click on the Server Classes tab.

If you are still facing issue regarding deployment server architecture Feel free to Ask Doubts in the Comment Box Below and Don’t Forget to Follow us on 👍 Social Networks, happy Splunking >😉


