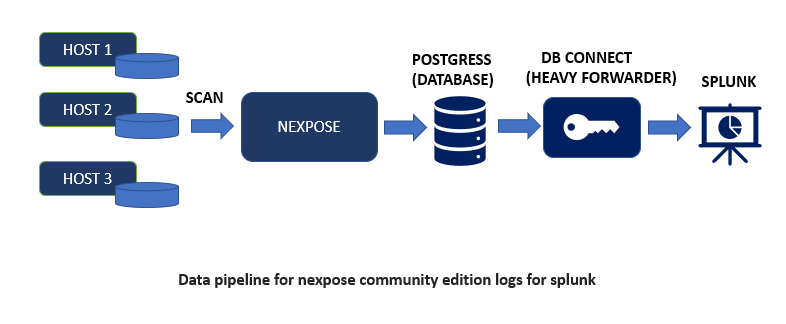
In this blog we are going to see how to install and configure the Nexpose Community edition and after that we are going to ingest its log in our Splunk Environment. After Getting the logs you can use the “Nexpose App for Splunk” available on Splunkbase https://splunkbase.splunk.com/app/6531/ to get an insight of the logs by using various Knowledge objects.
Nexpose
Nexpose is a Vulnerability Scanner, it identifies the active services, open ports, and running applications on each machine, and attempts to find vulnerabilities that may exist based on the attributes of the known services and applications.

Follow along the steps mentioned below to Install & Configure the Nexpose Community Edition.
Step-1: Download the Nexpose Community Edition.
Step-2: As mentioned below you can see we have transferred the downloaded file(Rapid7Setup-Linux64.bin) to a instance & changed the permission to executable by using chmod command:
chmod +x <nexpose-fileName.bin>

Step-3: Run this command to execute: ./Rapid7Setup-Linux64.bin

Step-4: After that follow the instructions along the snips as shown below:


When asked for Database port number, hit Enter to continue (default port is 5432). If needed enter the port number as per your requirements.

Enter the information in displayed fields (“First name”, “Last name”, “Company”) as per your requirements, as shown in below snip:

As mentioned in below snip enter a username and password (Note: these credentials are for the Nexpose UI)


As mentioned in above snip enter “y” if you want to initialize and start the nexpose after installation and enter “n” to do it manually later.

Now, the installation is finished.
Note: open the ports mentioned in above snip (i.e., 3780), which is Nexpose GUI default port.
Step-5: After Successful Installation, open the site in browser (eg:https://<server_ip>:3780) and enter the Product Key which you would have received on your mail.


Now that we have completed the Nexpose Community Edition Setup, lets send its log to our Splunk instance. To Get the data in Splunk, we need to export Nexpose Community Edition Data to an external Database known as “postgress”. Hence, Install Postgress on another Instance.
Note- Do not install Postgress where Nexpose is installed because Nexpose itself uses postgress for its purpose.
Postgress
Postgress is used as the primary data store or data warehouse for many web, mobile, geospatial, and analytics applications.
To install Postgress please check this link – PostgreSQL: Linux downloads (Ubuntu)
After Installing Postgress run the below commands to create a database and give right permission, we’ll send our Nexpose Community Edition logs to this database:
- CREATE DATABASE nexposeCE;
- create user nexposeCE with encrypted password <password>’;
- ALTER USER nexposeCE WITH SUPERUSER;
- ALTER DATABASE nexposece OWNER TO nexposece;
- GRANT ALL PRIVILEGES ON DATABASE nexposece TO nexposece;
- GRANT CONNECT ON DATABASE nexposece TO nexposece;
Note: We need to add some additional configuration in Postgress so that the communication link with Nexpose can be established.
Edit the pb_hba.conf to add the host as shown below:

And after that edit the postgresql.conf to add listen_addresses as shown below:

listen_addresses = ‘*’
To set IP address(es) to listen on; you can use comma-separated list of addresses; defaults to ‘localhost’, and ‘*’ is all ip address.
Splunk Data Onboarding
In order to onboard Nexpose data Install Splunk DB Connect on Splunk Heavy Forwarder and create connection between postgress and Splunk as shown below:
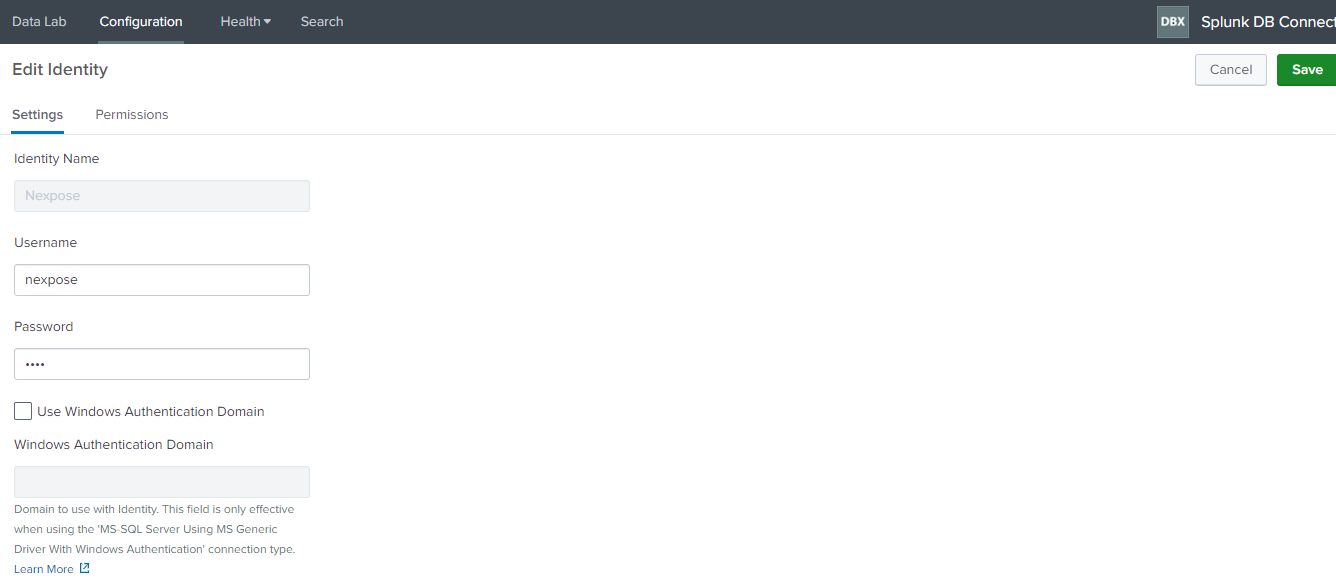
Navigate to “Configuration>Identity” in Splunk DB connect app and add the username and password of the database created in postgress.

To create New Connection click on “Configuration>New Connection”.

Connection Name – nexpose.
Identity – Nexpose.
Connection Type – Postgresql.
Host – Add your host.
Port – Add your port number
After that create inputs:

As Shown in the above images, three different inputs are created for Asset and vulnerability data and the queries we have used are mentioned below, you can modify or create your own query as per your requirement.
NexposeAsset:

NexposeVulnerability:

NexposeScan:

The above-mentioned steps & the queries used n Splunk Db-Connect can also be found here: at https://github.com/Avotrix/Nexpose-App-for-Splunk
If you are still facing an issue, feel free to Ask Doubts in the Comment Section Below and Don’t Forget to Follow us on 👍 Social Networks. Happy Splunking 😉


